When the holidays roll around, nothing captures that festive spirit quite like a Christmas Tree Cupcakes Recipe. These little treats turn ordinary cupcakes into playful, toasty-green holiday trees, perfect for parties, school events, or a cozy night in. You'll love how easy they are to make and how much joy they bring with their colorful candy ornaments and glossy frosting towers.
Jump to:
What Sets This Apart
This Christmas Tree Cupcakes Recipe isn't just cute - it's designed for reliable success and maximum holiday cheer. I've made these several times and always end up with cupcakes that are moist, vivid, and festive on sight, with frosting that holds perfectly for decorating.
- Consistent Results: Using a boxed cake mix with clear instructions makes the batter smooth and keeps the cupcakes fluffy every time.
- Rich, Balanced Flavor: The sweet frosting balances the subtle vanilla of the cupcakes without overwhelming your palate.
- Pantry-First Ingredients: You mainly need staples you likely already have plus holiday candies for decoration.
- Weeknight Friendly: Quick prep and bake times mean you can whip these up even on a busy day.
Ingredient Snapshot
The ingredient list for this Christmas Tree Cupcakes Recipe is straightforward, but quality counts, especially for the cake mix and frosting. Choose a flavorful cake mix as your base and use vibrant green food coloring that won't tint the taste.
- Cake Mix: I recommend a classic vanilla or white cake mix for a neutral, fluffy base that really shows off the green color.
- Green Food Coloring: Gel food coloring is best for a glossy, intense green without watering down the batter.
- Frosting: A thick, creamy frosting (store-bought or homemade) that holds shape well for piping is essential.
- Assorted Candies: Colorful candies like red, yellow, and green mini M&Ms or sprinkles look festive and add a fun crunch.
Quick Note: Exact measurements are in the printable recipe card at the bottom.
How to Make Christmas Tree Cupcakes Recipe
Step 1 - Prep & Season
Start by preparing your cake batter according to the box instructions - this usually means mixing the cake mix with eggs, oil, and water. Use a whisk or mixer to ensure the batter is smooth with no lumps. Gradually fold in green food coloring until you get a bright, festive shade; it's easier to add more color a little at a time. Line your muffin tin with cupcake liners and pour in the batter evenly, about two-thirds full to avoid overflowing as they bake. This typically takes around 10 minutes of prep, and a key tip is not to overmix after adding the color to keep the cupcakes tender.
Step 2 - Build Flavor
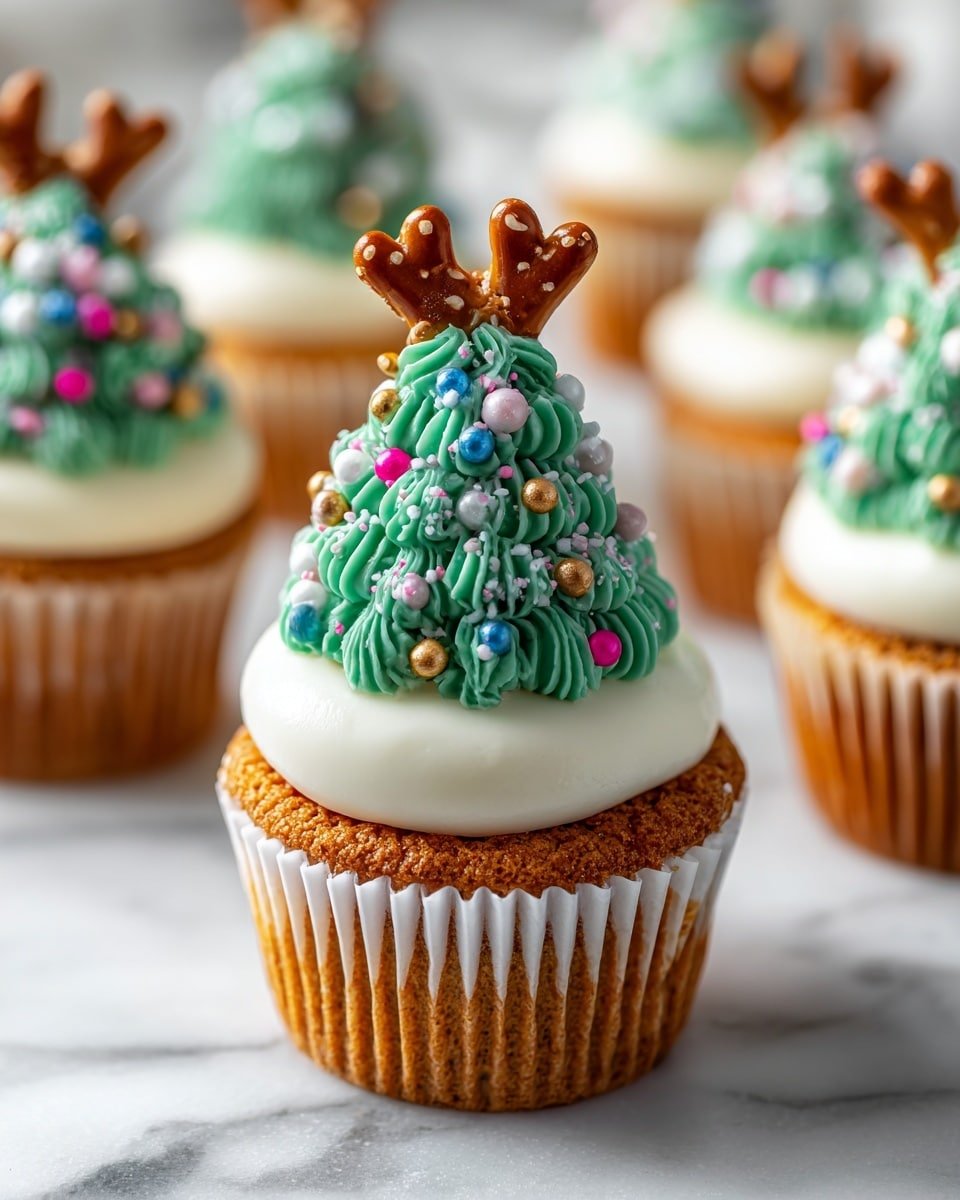
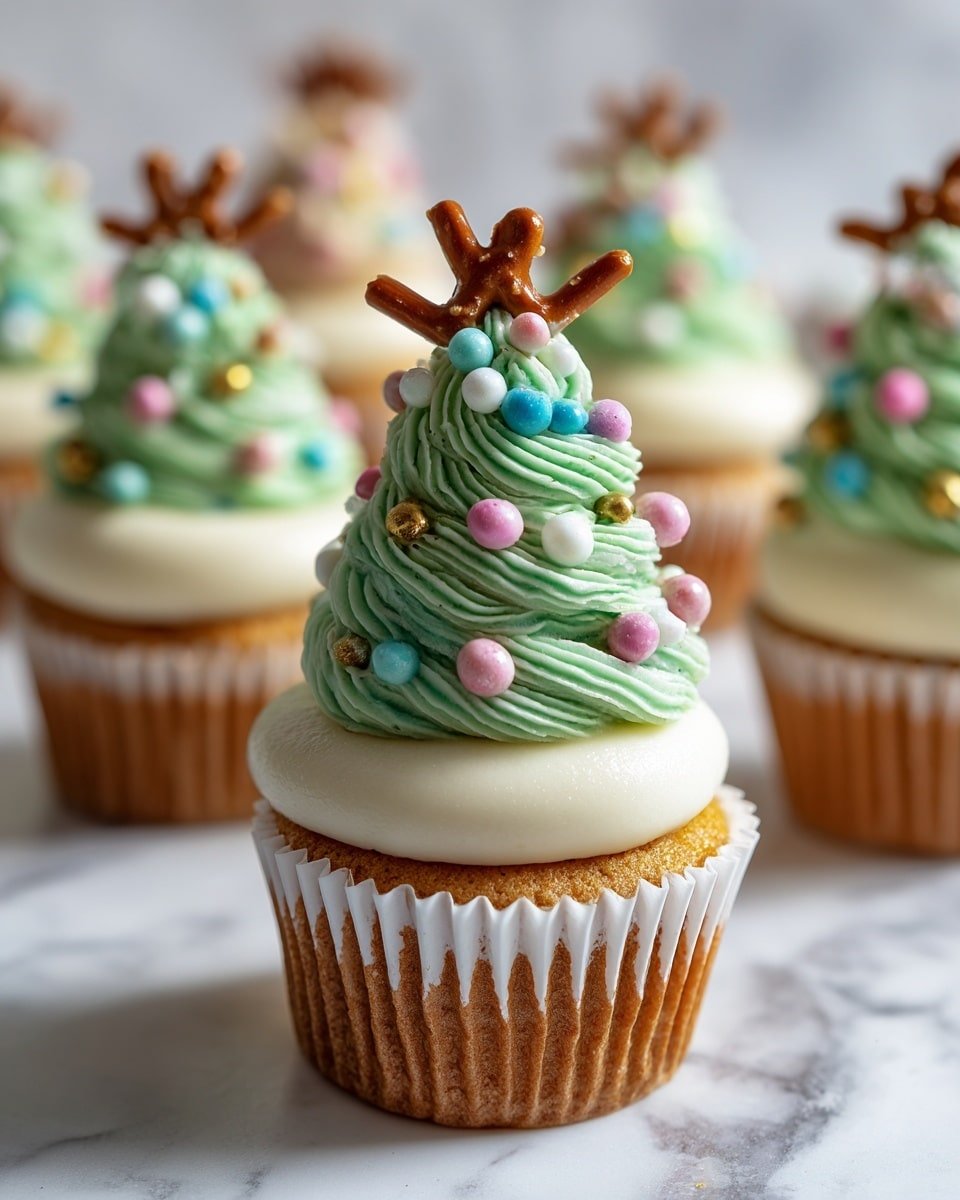
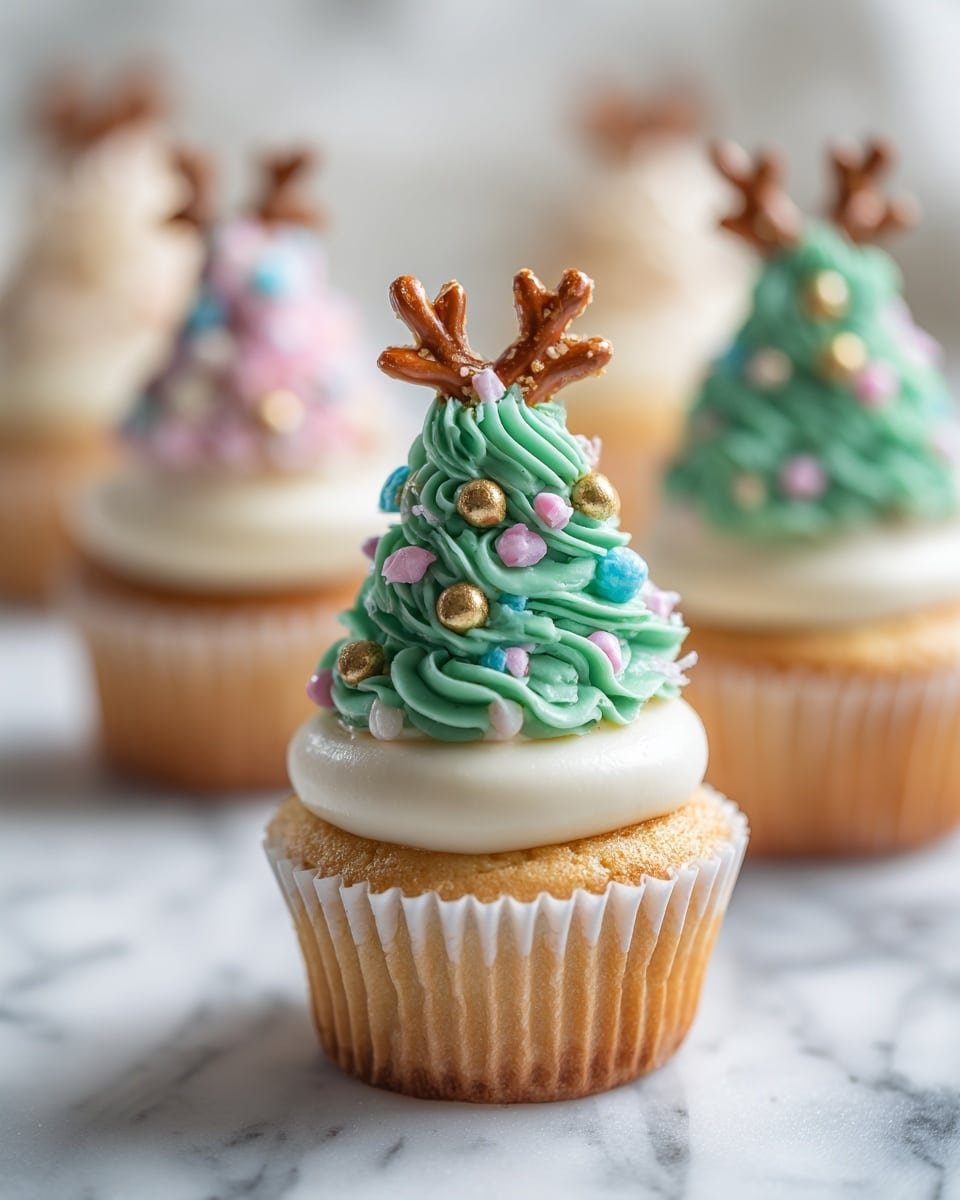
Once the cupcakes come out of the oven, cool them completely on a wire rack. This is a step I never skip because warm cupcakes will cause the frosting to melt and lose its shape. While cooling, prepare your frosting - whether you're using a creamy store-bought frosting or whipping up homemade buttercream, make sure it's smooth and fresh. When frosting the cupcakes, use a piping bag fitted with a star tip to swirl green frosting in a conical shape, mimicking a Christmas tree. Start in the center and spiral upwards slowly to create that classic tree look. This visual makes a wonderful impression and invites you to get creative with decorations.
Step 3 - Finish for Best Texture
Decorate by dotting assorted colorful candies onto the frosting to look like festive ornaments. Place them evenly but don't overcrowd; a few well-placed candies create a joyful sparkle without overwhelming the green frosting. Let the decorated cupcakes sit at room temperature for about 15 minutes so the frosting firms up slightly. This takes away any glossiness from fresh piping and helps the candies set firmly. The combination of soft cake, creamy frosting, and crunchy candies makes every bite a textural delight.
Cook's Notes & Tricks
I've found that the small details make or break your Christmas Tree Cupcakes Recipe. Paying attention to cooling times and piping technique will boost your confidence and impress friends and family alike.
- Doneness Cue: A toothpick inserted into the cupcake should come out clean or with just a few moist crumbs.
- Temperature Trick: Room temperature eggs and oil mix into the batter more uniformly, preventing dense spots.
- Make-Ahead Move: Bake cupcakes a day in advance and frost them the next day for easier decorating and fresher taste.
- Avoid This Pitfall: Don't frost cupcakes while warm - the frosting will melt and slide off, spoiling the shape.
Serve & Enjoy
Finishing Touches
For the frosting, I prefer a smooth, stable buttercream tinted bright green - it holds shape beautifully and tastes rich without being too sweet. Using a star piping tip adds texture reminiscent of pine needles, making your cupcakes look like little evergreen trees. The candy decorations are key because they bring that joyful splash of holiday color that makes you smile before the first bite.
Pairs Beautifully With
These cupcakes pair wonderfully with a warm cup of hot cocoa or a soft snowfall of powdered sugar dusted on top. For gatherings, serving them alongside a creamy eggnog or mulled cider balances the sweetness and adds cozy depth to your holiday table.
Simple Plating Wins
Arrange your Christmas Tree Cupcakes Recipe on a festive platter lined with pine sprigs or holly berries for instant holiday charm. Even a simple white plate surrounded by twinkling fairy lights will elevate the presentation. For a casual weeknight, keeping it straightforward with cupcake liners and a small sprinkle of colored sugar works just as well.
Make-Ahead, Storage & Reheat
Storing Leftovers
Store leftover cupcakes in an airtight container at room temperature if you plan to eat them within two days - this keeps the frosting fresh and the cake moist. For longer storage, place them in the fridge, but know that refrigeration can sometimes dry the cupcakes, so bring them back to room temp before serving.
Freezing Tips
Yes, these Christmas Tree Cupcakes freeze well if wrapped tightly in plastic wrap and stored in an airtight container or freezer bag. Freeze them unfrosted for best texture. When ready to enjoy, thaw overnight in the fridge and frost just before serving for the freshest results.
Reheating Christmas Tree Cupcakes Recipe Without Drying Out
Reheat gently using a microwave on low power for 10-15 seconds to avoid drying out the cake. You can also warm briefly in a preheated 300°F oven wrapped loosely in foil, which helps retain moisture. Avoid overheating to keep that soft crumb and creamy frosting intact.
Frequently Asked Questions
Absolutely! Homemade batter works wonderfully-just be sure it's well-mixed and smooth. You might want to adjust the green food coloring slowly to get that perfect shade and ensure your batter is not too thin, which could affect cupcake structure.
A thick buttercream or cream cheese frosting holds the best shape when piped. Avoid runny frosting as it won't maintain the tree's dimension. If your frosting is too soft, chill it briefly before piping.
Use an ice cream scoop or a measuring cup to ensure each cupcake cup is filled to the same level. This helps them bake evenly and produce uniform sizes which look best when decorated.
Definitely! Feel free to mix up candy colors or use edible glitter and sprinkles to match your holiday theme. The green frosting is the star, but adornments can reflect any festive style you like.
Final Thoughts
This Christmas Tree Cupcakes Recipe is one of those joyful, no-fuss desserts that brings warmth and smiles to any holiday table. I love how approachable it is - you don't have to be a seasoned baker to impress with these. The pops of color and the familiar cakey comfort make them a repeat favorite in my kitchen, and I bet you'll find your own creative twist too. Go ahead, make a batch, and let those sweet little trees spark a bit of holiday magic!
PrintFull Recipe
Christmas Tree Cupcakes Recipe

Create festive Christmas Tree Cupcakes with green-tinted cake batter, topped with swirled frosting and colorful candy decorations that mimic ornaments, perfect for holiday celebrations.
- Prep Time: 10 minutes
- Cook Time: 20 minutes
- Total Time: 30 minutes
- Yield: 12 cupcakes
- Category: Dessert
- Method: Baking
- Cuisine: American
- Diet: Vegetarian
Ingredients
Cake Batter
- 1 box cake mix
- Green food coloring (as needed)
Frosting and Decoration
- 1 cup frosting (store-bought or homemade)
- Assorted colorful candies (such as red, yellow, and green M&Ms, sprinkles, or mini candies) - quantity as desired
Instructions
- Prepare Cake Batter: Follow the instructions on the cake mix box to mix the batter thoroughly until smooth and consistent.
- Add Food Coloring: Gradually stir green food coloring into the batter until you achieve your preferred festive shade of green.
- Bake Cupcakes: Pour the green batter evenly into cupcake liners placed in a muffin tin, and bake at the temperature and time specified on the cake mix package, typically 20 minutes at 350°F (175°C).
- Cool Completely: Remove the cupcakes from the oven and place them on a wire rack to cool fully, ensuring the frosting will adhere properly and not melt.
- Frost Cupcakes: Using a piping bag or spatula, frost each cupcake with the green frosting, creating a swirling Christmas tree shape by starting at the center and spiraling outward and upward.
- Decorate: Add assorted colorful candies onto the frosted cupcakes to resemble Christmas tree ornaments, arranging them as baubles or scattering for a joyful festive look.
Notes
- Use gel food coloring for a more vibrant green without thinning the batter.
- If homemade frosting is preferred, a classic buttercream is a great choice for piping shapes.
- Let cupcakes cool completely to prevent frosting from melting and sliding off.
- Experiment with different candies for decorating to personalize the look.
- Store cupcakes in an airtight container to keep them fresh.

Leave a Reply