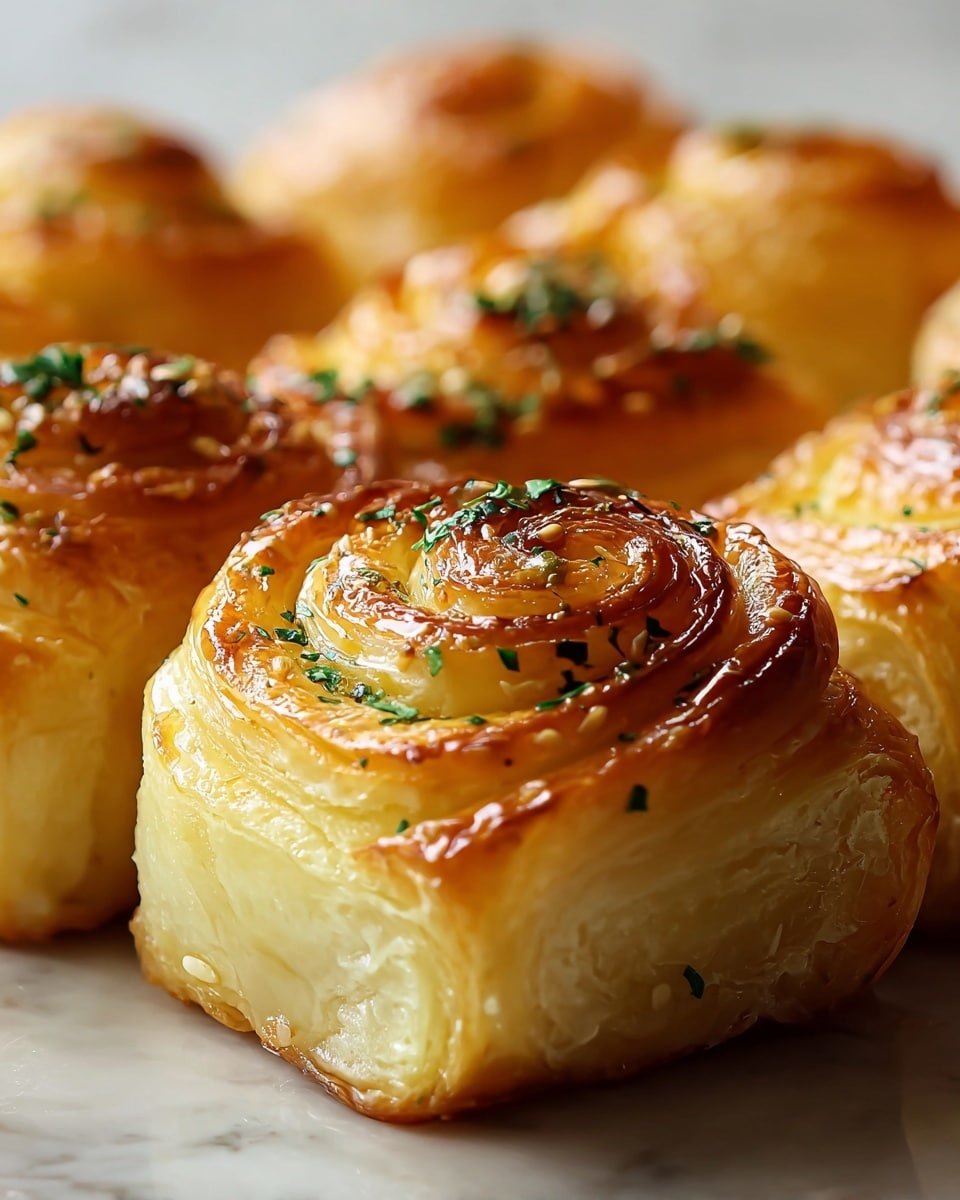
Cheesy Garlic Butter Rollups Recipe are these irresistible little pockets of cheesy, buttery goodness that come together quickly and work for a variety of occasions. Whether you're whipping up a snack for movie night, a cozy appetizer for friends, or a game day treat, these rollups deliver that soft, glossy, garlicky crust that you'll want to reach for again and again.

Jump to:
What Sets This Apart
This Cheesy Garlic Butter Rollups Recipe stands out by combining simple pantry staples into a melty, garlicky treat with a beautifully golden crust. I've made plenty of cheesy snacks, but the balance here-cheese inside and buttery garlic brushed generously outside-hits a sweet spot of flavor and texture that feels just right every time.
- Consistent Results: Using refrigerated crescent dough guarantees soft, pillowy rollups without fuss.
- Rich, Balanced Flavor: The combo of mozzarella and Parmesan adds gooey melt and a sharp, nutty kick.
- Pantry-First Ingredients: You'll probably have all of it on hand, so no extra store runs.
- Weeknight Friendly: Ready in under 20 minutes, perfect when you want something fast and comforting.
Ingredient Snapshot
Focus on quality where it counts: a fresh garlic punch and good mozzarella will make these rollups shine. Don't overthink the cheese, but try to pick a mozzarella that melts smoothly and a Parmesan that's flavorful without being overpowering.
- Crescent Roll Dough: Look for refrigerated dough with minimal preservatives for best texture and rise.
- Shredded Mozzarella: Freshly shredded performs better than pre-shredded because it melts more evenly.
- Grated Parmesan: Use real Parmesan, not the powdered stuff, for a sharper, deeper flavor.
- Unsalted Butter: Controls salt levels and lets the garlic and seasoning shine through.
- Garlic & Italian Seasoning: Freshly minced garlic provides a bright kick, while Italian seasoning adds an herby aroma.
Quick Note: Exact measurements are in the printable recipe card at the bottom.
How to Make Cheesy Garlic Butter Rollups Recipe
Step 1 - Prep & Season
Start by preheating your oven to 375°F (190°C) and lining a baking sheet with parchment paper. This saves you the hassle of scrubbing later and ensures your rollups don't stick. Unroll your crescent dough carefully and separate it into 8 triangles. Keep them on the counter just until you're ready to fill-they should stay cool but flexible to roll up easily.
Step 2 - Build Flavor
Lay out your crescent triangles and sprinkle 1 to 2 tablespoons of shredded mozzarella on each, then add a light dusting of Parmesan. Don't overload the cheese-if it spills out, the rollups get messy in the oven. Roll each triangle from the wide end toward the point, capturing the cheese inside. Place them seam-side down on your lined baking sheet so they keep their shape while baking.
Step 3 - Finish for Best Texture
Mix melted butter with minced garlic, Italian seasoning, and a pinch of salt. Brush this fragrant garlic butter generously over each rollup, coating them for that irresistible golden sheen. Bake for 10 to 12 minutes, keeping a close eye: you want the tops glossy and golden but not burnt, and the cheese inside bubbling but not oozing out in a mess.
Cook's Notes & Tricks
From personal experience, the key to success with this Cheesy Garlic Butter Rollups Recipe is balancing the garlic butter-too little and it dries out, too much and it sogs the dough. Also, rolling gently but firmly keeps that cheesy center intact. Letting the rollups rest a minute after baking really helps the cheese set so you don't burn your mouth.
- Doneness Cue: Look for golden, slightly glossy tops and no dough puffing at the seams.
- Temperature Trick: Use room temperature butter for mixing so it blends evenly with garlic and seasoning.
- Make-Ahead Move: You can assemble the rollups, cover tightly, and refrigerate for up to 4 hours before baking.
- Avoid This Pitfall: Don't overfill with cheese or it will leak and cause uneven baking.
Serve & Enjoy

Finishing Touches
A sprinkle of fresh chopped parsley right after baking adds color and a fresh herb note to balance the richness. If you have extra Parmesan, dusting a bit on top while the rollups are still warm adds a nice sharp hit that contrasts beautifully with the buttery crust.
Pairs Beautifully With
You'll enjoy these rollups alongside a crisp green salad with a tangy vinaigrette, or perhaps a bowl of tomato soup for cozy dipping. They also make a fantastic companion to spicier main dishes, as the mellow, cheesy butter flavor helps mellow heat and add indulgence.
Simple Plating Wins
Arrange the rollups in a neat circle or line on a pretty platter and garnish with parsley sprigs or edible flowers for when guests arrive. For casual nights, a rustic wooden board works well, encouraging everyone to grab one and dig in.
Make-Ahead, Storage & Reheat
Storing Leftovers
Store leftover rollups in an airtight container in the fridge for up to 3 days. They'll soften slightly but stay flavorful and melty inside. I like to keep a layer of paper towel underneath to absorb any excess moisture and prevent sogginess.
Freezing Tips
Freezing works fine if you wrap rollups individually in plastic wrap and then place in a freezer-safe bag. Thaw overnight in the fridge before reheating for best texture. They won't be quite as crisp as fresh but still tasty and satisfying.
Reheating Cheesy Garlic Butter Rollups Recipe Without Drying Out
The oven or air fryer are your best bets here. Reheat at 325°F for 5-7 minutes until warm and just-starting to crisp. If using a microwave, cover loosely with a damp paper towel to lock in moisture and heat in short 20-second bursts to avoid drying out.
Frequently Asked Questions
Absolutely! While mozzarella and Parmesan are classic here, swapping in cheddar, fontina, or even pepper jack can add unique flavors. Just choose cheeses that melt well to keep the texture gooey.
You can use refrigerated biscuit dough or even puff pastry as alternatives. The texture and rise will shift a bit, but the overall cheesy, buttery vibe will still come through.
Yes! Assemble the rollups and keep them covered in the fridge for up to 4 hours before baking. This makes entertaining much simpler and keeps them fresh-tasting.
Line your baking sheet with parchment paper and avoid brushing butter on the bottom side. Also, bake on the middle rack for even heat circulation.


Leave a Reply