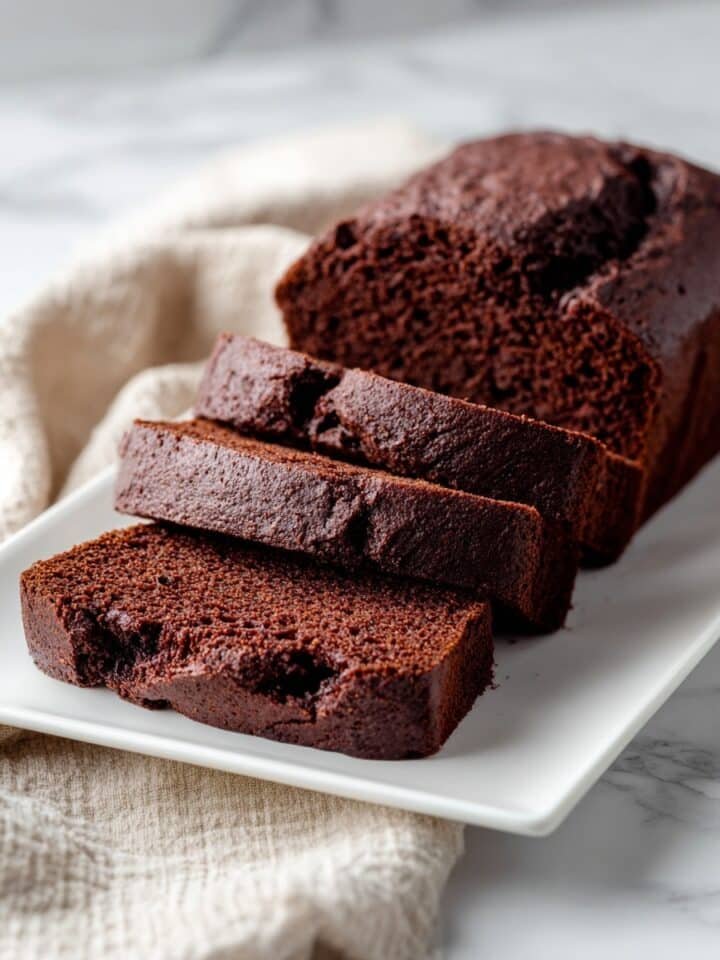
The Devil's Food Chocolate Peanut Butter Whoopie Recipe is a delightful treat that combines rich chocolate cake rounds with a luscious peanut butter chocolate buttercream. It's perfect whenever you want an indulgent dessert that feels special but comes together surprisingly easily. Whether you're baking for a weeknight dessert or for a festive gathering, this recipe offers that perfect balance of deep cocoa and creamy peanut butter that's hard to resist.
Jump to:
What Sets This Apart
What I love about this Devil's Food Chocolate Peanut Butter Whoopie Recipe is that it hits that perfect combination of fluffy, moist chocolate cake and a wonderfully smooth, peanut buttery filling with a touch of bittersweet chocolate. The flavors meld in a way that feels indulgent without being overwhelming, and the texture contrast between the pillowy cake and creamy buttercream is exactly on point.
- Consistent Results: Using softened butter and precise mixing techniques ensures each whoopie cake comes out tender and even every time.
- Rich, Balanced Flavor: The cocoa and peanut butter complement one another beautifully, with a hint of dark chocolate rounding it out.
- Pantry-First Ingredients: You can make this with staples on hand-no rare extras needed.
- Weeknight Friendly: From start to finish, you're looking at around 45 minutes, perfect for an easy, crowd-pleasing bake.
Ingredient Snapshot
Choosing quality ingredients really lifts this Devil's Food Chocolate Peanut Butter Whoopie Recipe from good to memorable. I always keep on hand real unsweetened cocoa powder and creamy peanut butter without added salt or sugars for the cleanest flavor.
- Unsweetened cocoa powder: Opt for Dutch-processed if you can; it gives a smoother, deeper chocolate flavor.
- Unsalted butter: Soften it to room temperature for easy creaming with sugar.
- Creamy peanut butter: Make sure it's smooth for the silkiest buttercream texture.
- Whole milk: Adds richness and tender crumb to the cake rounds.
- Dark unsweetened chocolate: Melts down to add an elegant chocolate depth to the peanut butter filling.
Quick Note: Exact measurements are in the printable recipe card at the bottom.
How to Make Devil's Food Chocolate Peanut Butter Whoopie Recipe
Step 1 - Prep & Season
Start by preheating your oven to 350°F and prepping your whoopie pie pan-grease it well with baking spray or line the cavities with paper liners. This simple prep step prevents sticking and helps your cake rounds release easily once baked. Cream the softened butter with the sugar until the mixture is light and fluffy; this usually takes about 3 to 4 minutes with a stand mixer. You'll notice the sugar integrating and the mixture becoming glossy and airy, which sets a tender crumb in the cakes.
Step 2 - Build Flavor
Next, add eggs and vanilla extract to your creamed butter and sugar, mixing until the batter is smooth and well combined. Meanwhile, whisk together your dry ingredients-flour, cocoa powder, baking soda, baking powder, and salt. Gradually add the dry mix to the wet ingredients, mixing gently to avoid overworking the batter. When you pour in the milk, do so gradually and mix just until smooth. Overmixing here can lead to dense, dry rounds, so watch the texture carefully-I love to stop mixing as soon as there are no visible streaks of flour or cocoa.
Step 3 - Finish for Best Texture
Use an ice cream scoop or large spoon to fill each cavity about halfway to two-thirds full-this lets the rounds rise nicely without spilling over. Bake in the center rack for 12 to 15 minutes, checking at around 12 minutes with a toothpick. You'll want it to come out clean or only with a few moist crumbs clinging. Let the cakes cool in the pan briefly, then transfer to a wire rack so they cool fully before filling; warm cakes cause the buttercream to melt and get messy.
Cook's Notes & Tricks
In my experience, the key to perfect whoopie pies lies in watching the texture of both your batter and buttercream. Slightly underbaking the cake rounds by a minute or two will keep them soft and moist. When making the chocolate peanut butter buttercream, adding the melted chocolate last and whipping it well brings out a beautiful, glossy finish and light texture that's irresistible.
- Doneness Cue: Toothpick comes out with a few moist crumbs but not wet batter.
- Temperature Trick: Always cool cake rounds completely before assembling to keep buttercream stable.
- Make-Ahead Move: Bake rounds a day ahead and store wrapped airtight for best texture.
- Avoid This Pitfall: Don't overmix batter after adding dry ingredients; it results in tougher cakes.
Serve & Enjoy
Finishing Touches
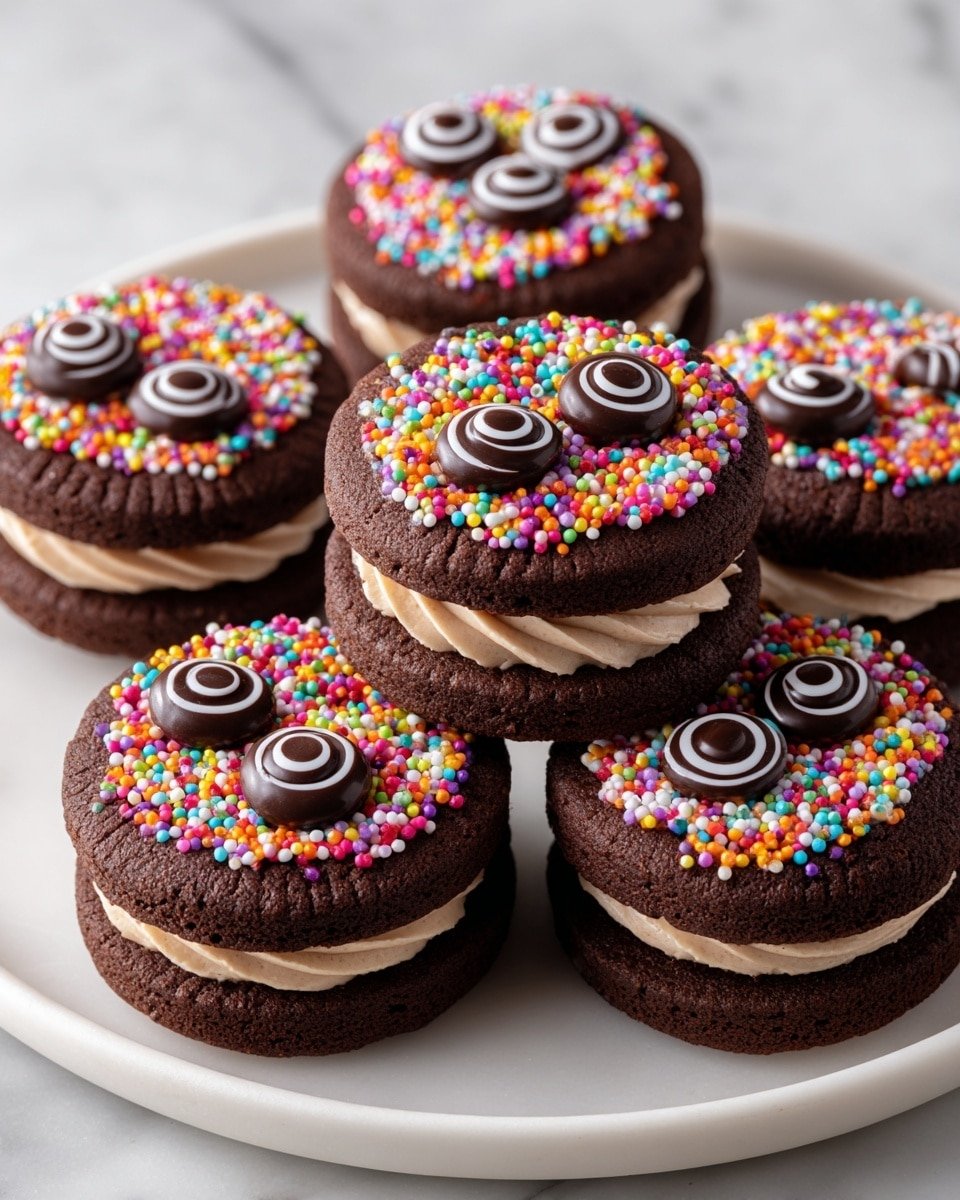
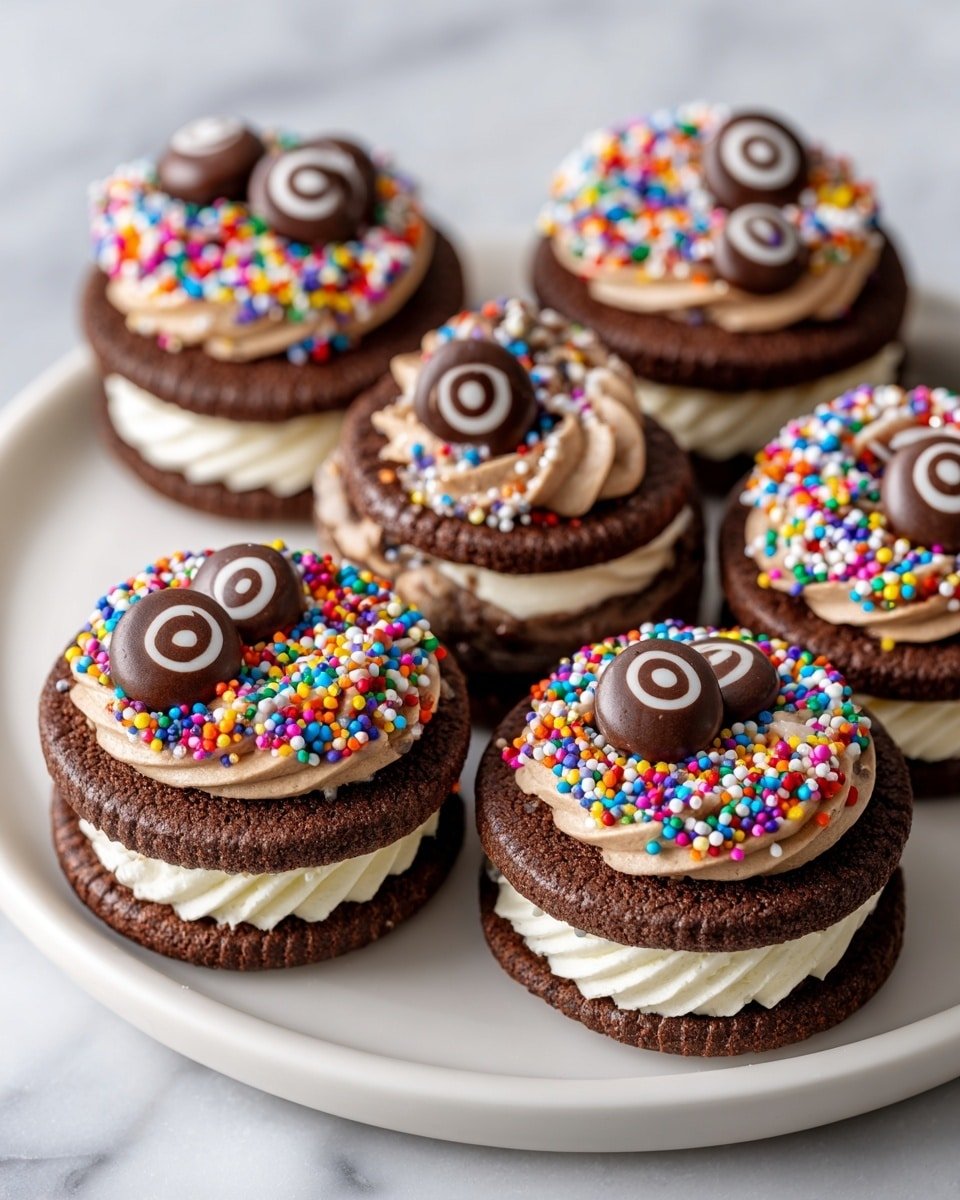
To finish these Devil's Food Chocolate Peanut Butter Whoopie rounds, simply spread or pipe a generous amount of the chocolate peanut butter buttercream onto the flat side of half the cake rounds, then top with the remaining halves to create neat little sandwiches. If you're feeling festive, adding candy eyeballs gives them a playful, seasonal vibe - perfect for occasions like Halloween or an unexpected pop of fun.
Pairs Beautifully With
I love pairing these whoopie pies with a hearty glass of cold milk or a rich espresso for balance. A scoop of vanilla ice cream on the side ramps up the indulgence, too. The creamy peanut butter filling complements nutty or caramel notes in your beverage or side, making every bite a comforting moment.
Simple Plating Wins
For an easy presentation, arrange your whoopie pies on a rustic wooden board or a bright cake stand to contrast with their deep chocolate color. Dusting with a light sprinkle of powdered sugar or cocoa powder can add a lovely touch without fuss. If you're serving a crowd, placing them in neat rows with small parchment papers between layers helps keep things tidy and inviting.
Make-Ahead, Storage & Reheat
Storing Leftovers
Store leftover whoopie pies in an airtight container in the refrigerator for up to 3 days. The cake rounds stay soft, and the buttercream remains creamy but firm. Just let them come to room temperature before eating for the best flavor and texture.
Freezing Tips
These whoopie pies freeze well, especially if you wrap each sandwich individually in plastic wrap and then place them in a freezer-safe container. Freeze for up to two months. To thaw, move them to the fridge overnight and then bring them to room temperature before serving. This keeps the cake moist and the buttercream stable.
Reheating Devil's Food Chocolate Peanut Butter Whoopie Recipe Without Drying Out
If you want to warm these just a bit, use a microwave at 50% power in 10-second bursts to avoid melting the buttercream completely. Alternatively, warming them in an oven at 300°F for about 5 minutes on a baking sheet can help revive softness without losing moisture. Avoid high heat-it's easy to dry out the cake or make the filling too soft to handle.
Frequently Asked Questions
Yes! Substitute the all-purpose flour with a 1:1 gluten-free baking flour blend that contains xanthan gum. The texture might be slightly different but still delicious.
I prefer melting chocolate gently using a double boiler or in short bursts in the microwave, stirring in between to avoid burning and to achieve a smooth, glossy texture.
You can, but natural peanut butter has more oil and a looser texture, so your buttercream might be thinner. You may need to add a bit more powdered sugar to thicken it.
Greasing the pan well with baking spray or using individual paper liners in the cavities helps release the cakes easily without damage.
Final Thoughts
Making the Devil's Food Chocolate Peanut Butter Whoopie Recipe is one of those satisfying baking experiences-where the effort feels minimal but the result feels special. I love sharing these with friends because they look charming and taste like you spent hours in the kitchen. With easy-to-follow steps and straightforward ingredients, you'll find yourself reaching for this recipe whenever you want a reliable, crowd-pleasing dessert with a luscious twist of peanut butter and chocolate.
PrintFull Recipe
Devil's Food Chocolate Peanut Butter Whoopie Recipe

Delight in the rich and decadent flavors of Devil's Food Chocolate Peanut Butter Whoopie pies. These moist chocolate cake rounds sandwich a luscious chocolate peanut butter buttercream, perfect for festive gatherings or a special treat.
- Prep Time: 30 minutes
- Cook Time: 15 minutes
- Total Time: 45 minutes
- Yield: 12 servings
- Category: Dessert
- Method: Baking
- Cuisine: American
Ingredients
Chocolate Cake Rounds
- 6 tablespoons unsalted butter, softened
- 1 cup granulated sugar
- 2 large eggs
- 1 teaspoon pure vanilla extract
- 1 cup all-purpose flour
- ½ cup unsweetened cocoa powder
- ¾ teaspoon baking soda
- ½ teaspoon baking powder
- ½ teaspoon fine salt
- ¾ cup whole milk
Chocolate Peanut Butter Buttercream
- ½ cup unsalted butter, softened
- 4 cups powdered sugar
- ¼ cup whole milk
- ½ cup creamy peanut butter
- 2 ounces dark unsweetened chocolate, melted and cooled
Decoration
- Candy eyeballs, for garnish (optional)
Instructions
- Preheat and Prepare: Preheat your oven to 350°F. Grease a whoopie pie pan with baking spray or line it with paper liners to prevent sticking.
- Make Cake Batter: In the bowl of a stand mixer, beat the softened butter with granulated sugar until the mixture is light and fluffy. Add the eggs and vanilla extract, mixing until fully combined.
- Combine Dry Ingredients: In a separate bowl, whisk together all-purpose flour, unsweetened cocoa powder, baking soda, baking powder, and fine salt.
- Mix Dry and Wet: Gradually add the dry ingredients to the wet mixture, stirring until just combined. Pour in the whole milk and blend until a smooth batter forms, being careful not to overmix.
- Fill the Pan: Using an ice cream scoop or large spoon, fill each cavity of the prepared pan halfway to two-thirds full. Use a small offset spatula to spread the batter evenly.
- Bake the Cake Rounds: Place the pan in the center of the oven and bake for 15 minutes or until a toothpick inserted in the center comes out clean or with a few moist crumbs.
- Cool the Cakes: Let the cakes cool in the pan for several minutes before gently transferring them to a wire rack. Allow them to cool completely before assembling.
- Prepare Buttercream: In a stand mixer bowl, beat the softened butter with powdered sugar and milk until smooth and creamy. Add the creamy peanut butter and melted dark chocolate, then whip the mixture until light and fluffy.
- Assemble Whoopie Pies: Spread or pipe the buttercream onto the flat side of half the cakes. Top each with a second cake to form sandwiches.
- Decorate and Serve: Garnish with candy eyeballs for a festive touch if desired. Serve immediately and enjoy.
Notes
- For a dairy-free version, substitute whole milk and butter with plant-based alternatives like almond milk and vegan butter.
- Ensure the melted chocolate is cooled before adding to the buttercream to prevent melting the butter.
- Use a cookie scoop for uniform cake rounds and even baking.
- If you don't have a whoopie pie pan, you can use parchment-lined baking sheets, spacing batter mounds 2 inches apart.
- Store assembled whoopie pies in an airtight container in the refrigerator for up to 3 days.


Leave a Reply