The Holiday Snowman Cheese Ball Recipe is a cheerful and delicious centerpiece perfect for any festive gathering. It's ideal when you want a fun, crowd-pleasing appetizer that brings smiles and easy snacking to your holiday table. This recipe turns simple cream cheese and veggies into a cute snowman shape that's as tasty as it is adorable.
Jump to:
What Sets This Apart
This Holiday Snowman Cheese Ball Recipe stands out by combining texture, flavor, and whimsy in one easy-to-make dish that looks like it took hours of effort. I love how approachable it is, especially when you want to bring a creative touch without fuss.
- Consistent Results: The precise chilling step ensures your snowman holds its shape beautifully, every time.
- Rich, Balanced Flavor: Cream cheese is brightened with fresh parsley and sweet cranberries, plus a savory spice mix.
- Pantry-First Ingredients: Most ingredients are common and easy to find, letting you whip it up on a whim.
- Weeknight Friendly: Prep is quick, and chilling fits neatly into your schedule ahead of serving.
Ingredient Snapshot
Quality simple ingredients make all the difference here. Fresh herbs and perfectly softened cream cheese create a creamy, flavorful base that's easy to shape and decorate.
- Cream Cheese: Choose full-fat, softened to room temperature for smooth mixing and the right texture.
- Red Bell Pepper: Finely chopped for a mild, sweet crunch and festive color pops.
- Fresh Parsley: Gives a subtle freshness - fresh over dried works best.
- Dried Cranberries: Adding just a touch of chewiness and natural sweetness.
- Black Olives & Carrot: For classic snowman features - avoid watery olives that might soften the cheese ball exterior.
- Pretzels & Fresh Herbs: For charming, edible arms and garnish that complete the look.
Quick Note: Exact measurements are in the printable recipe card at the bottom.
How to Make Holiday Snowman Cheese Ball Recipe
Step 1 - Prep & Season
Start by softening your cream cheese to room temperature - this takes about 30 minutes on the counter but makes mixing effortless. Combine it in a large bowl with finely chopped red bell pepper, fresh parsley, dried cranberries, and spices. Mix thoroughly until the ingredients are evenly incorporated. You'll notice the texture is creamy and dotted with bursts of color and flavor. Avoid overmixing to keep a pleasant chunkiness from the veggies and berries.
Step 2 - Build Flavor
Next, divide the mixture carefully into two portions - about two-thirds for the body and one-third for the head. Firmly shape them into smooth, compact balls. I like to press firmly but gently to eliminate air pockets that can weaken the structure. This step is key because it sets the foundation for your snowman's shape and solid feel.
Step 3 - Finish for Best Texture
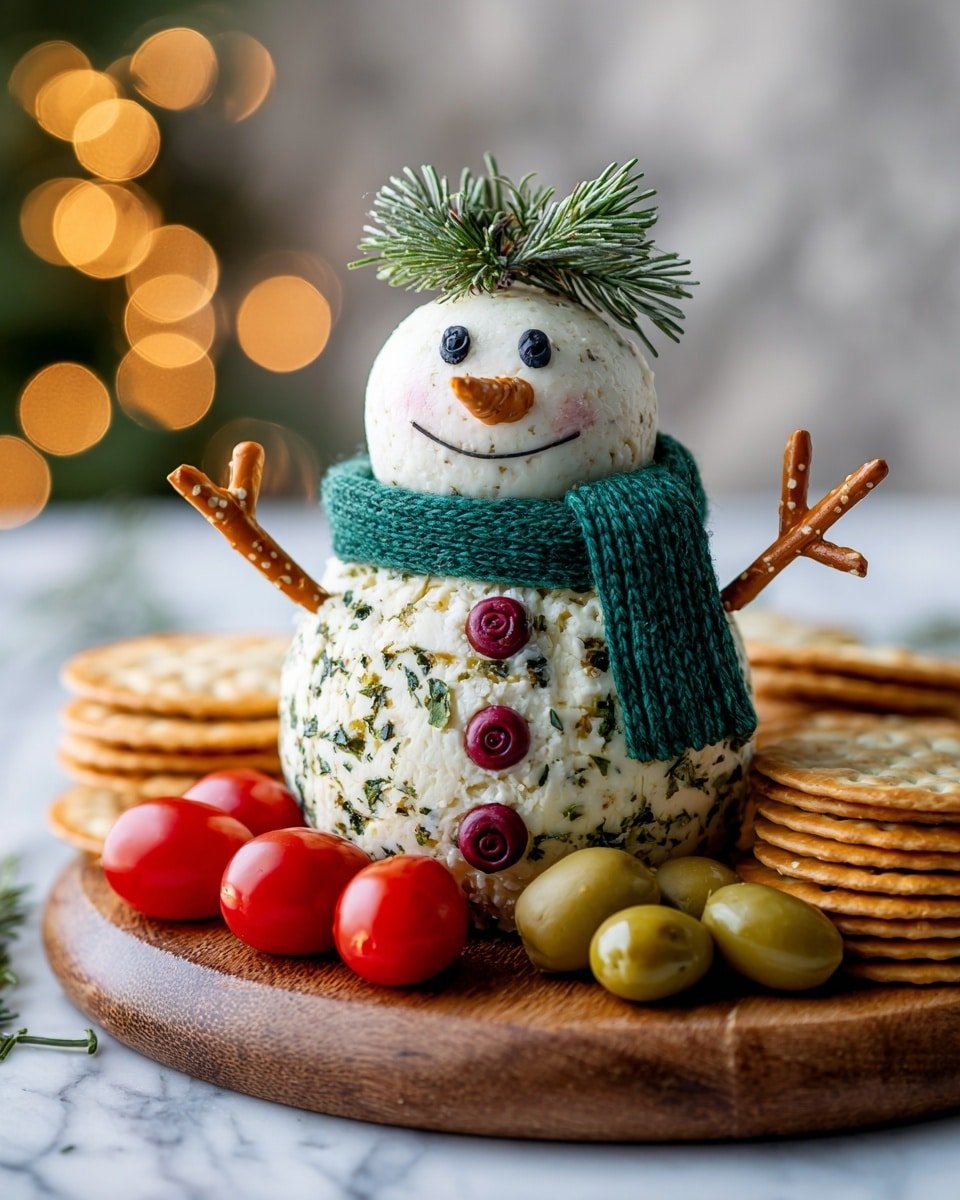
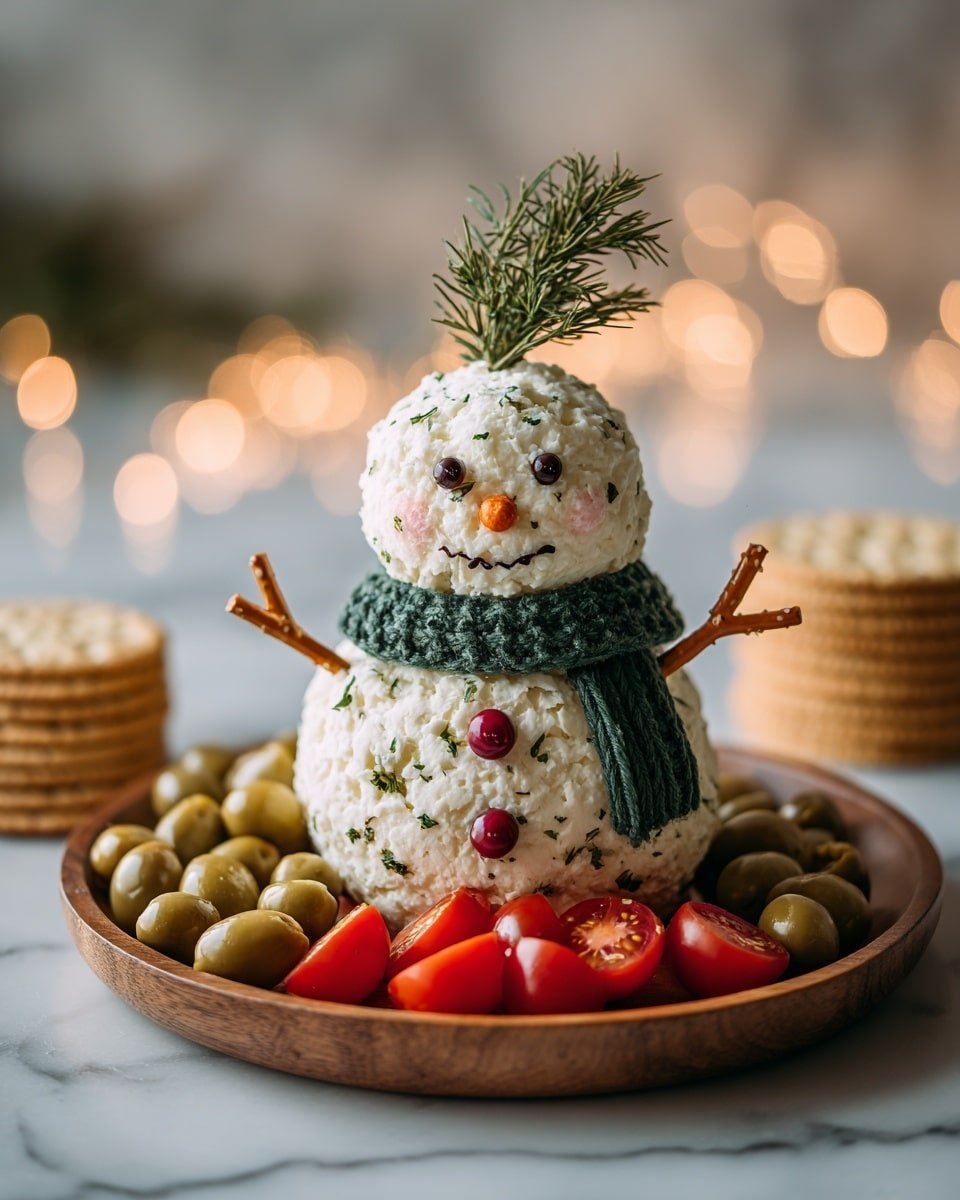
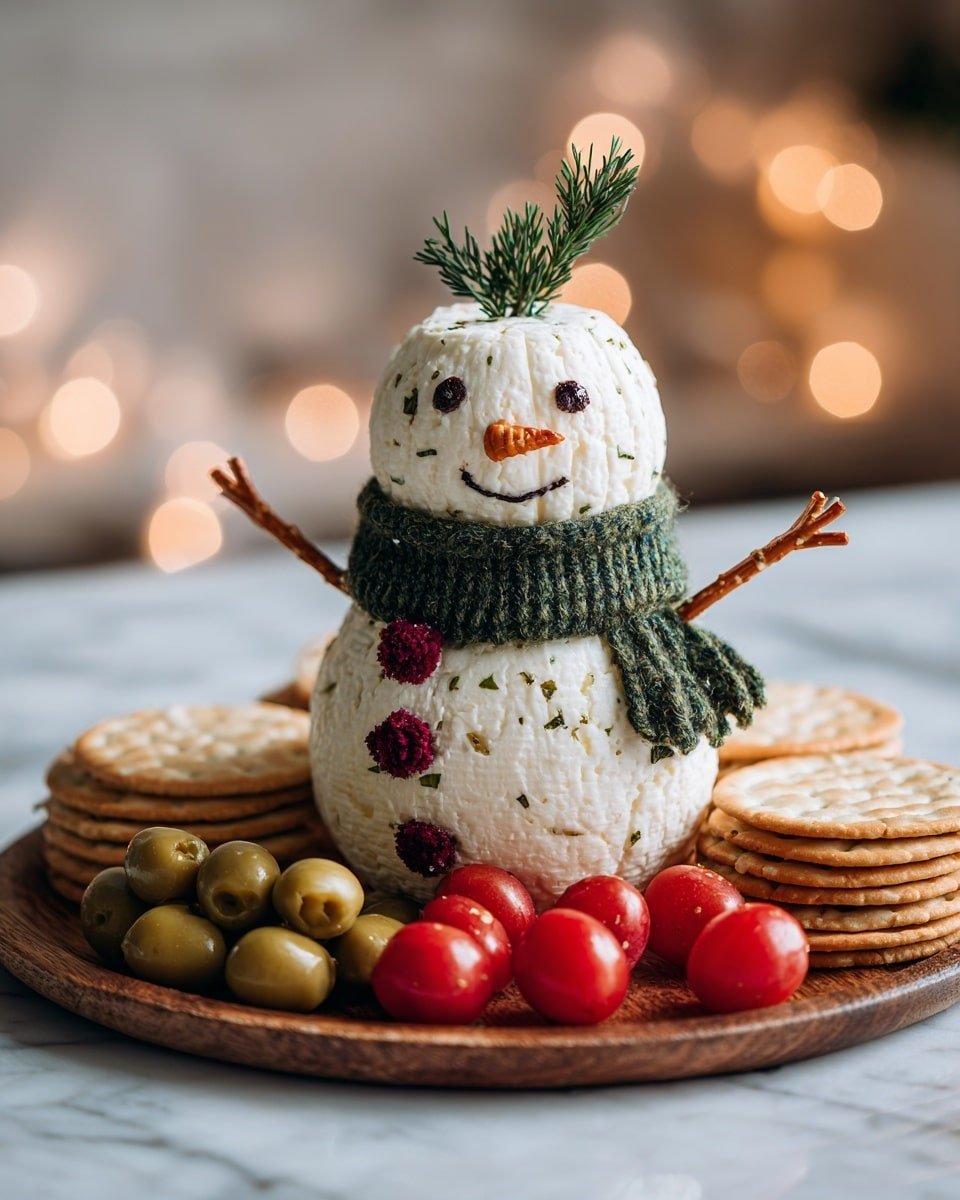
Wrap each cheese ball tightly in plastic wrap and chill for at least 2 hours; longer if you can, even overnight. This chilling firm up the cheese, locking the shape so your snowman looks polished and won't slump. Once firm, carefully stack the head on the body right on your serving platter. Decorate with sliced black olives for eyes and buttons, a carrot nose, pretzel arms, and fresh herb sprigs for personality. These small details seal the festive look while adding textural contrast.
Cook's Notes & Tricks
I've found that the chilling step isn't optional - skipping it means your snowman won't hold its elegant shape. Also, use fresh herbs and good-quality cream cheese to maximize flavor and appearance. When you decorate, don't be too rough inserting the features or you risk cracking the cheese balls.
- Doneness Cue: The cheese balls should feel firm and cold, holding their shape without giving under slight pressure.
- Temperature Trick: Store in the fridge until just before serving to keep the cheese from softening too much.
- Make-Ahead Move: Form and chill the cheese balls a day in advance for stress-free entertaining.
- Avoid This Pitfall: Don't skip wrapping tightly with plastic wrap, or the balls will dry out and crack.
Serve & Enjoy
Finishing Touches
I like to arrange a colorful mix of crackers, cherry tomatoes, and green olives around the snowman. These serve both as garnish and tasty pairings, offering crunchy and juicy bites that complement the creamy cheese perfectly. Plus, those bright colors make the platter pop visually.
Pairs Beautifully With
This Holiday Snowman Cheese Ball Recipe shines when served with a variety of crunchy crackers-think multigrain, water crackers, or buttery herb crackers. Fresh veggies like crisp celery sticks or cucumber slices also balance the richness, adding refreshing crispness to every bite.
Simple Plating Wins
For a casual feel, keep the snowman centered on a wooden board surrounded by loose crackers and scattered olives. For a party-ready look, add sprigs of fresh rosemary or thyme and a few bright pomegranate seeds to echo the festive vibes. The key is a clean, inviting setup that invites guests to dig in.
Make-Ahead, Storage & Reheat
Storing Leftovers
Store leftover cheese ball tightly wrapped in plastic wrap or in an airtight container in the refrigerator. It will keep well for up to 4 days. You might notice the texture firms up slightly when chilled again, which works fine for snacking but avoid freezing if possible to keep the best creamy mouthfeel.
Freezing Tips
This cheese ball doesn't freeze well because cream cheese texture can turn grainy. If you must freeze, wrap tightly and thaw slowly in the fridge overnight, but I recommend making fresh for the best taste and texture.
Reheating Holiday Snowman Cheese Ball Recipe Without Drying Out
This recipe is served cold and shouldn't be reheated. If you want the cheese softer, let it sit at room temperature for 15-20 minutes before serving. Microwaving or heating will spoil the texture and isn't recommended.
Frequently Asked Questions
Yes! While cream cheese is the base here for its texture and mild flavor, you can fold in shredded cheddar or goat cheese for a tangier spin. Just keep the total amount similar so the snowman holds shape.
You can prepare and chill the cheese balls up to 24 hours ahead. Just keep them wrapped tightly in plastic wrap in the fridge until serving.
Make sure your cream cheese is fully softened and evenly mixed with the add-ins. If it feels dry, a tablespoon of cream or sour cream can help bind it better.
Absolutely! Miniature snowmen make great individual servings-just adjust the amount and chill times accordingly.
Final Thoughts
I love how this Holiday Snowman Cheese Ball Recipe brings a bit of magic and whimsy to any party without complicated steps. Its balance of creamy, sweet, and savory hits the spot every time, and you'll find your guests coming back for more. Whether you make it for a holiday gathering, winter potluck, or an impromptu cozy night, this recipe is a delightful and approachable way to impress while keeping it simple. You've got this!
PrintFull Recipe
Holiday Snowman Cheese Ball Recipe

This festive Holiday Snowman Cheese Ball is a delightful centerpiece and appetizer made with cream cheese, fresh herbs, dried cranberries, and colorful vegetables. Shaped into a charming snowman and garnished with olives, carrots, and pretzels, it's perfect for holiday parties and gatherings.
- Prep Time: 20 minutes
- Cook Time: 0 minutes
- Total Time: 2 hours 20 minutes
- Yield: 8 servings
- Category: Appetizer
- Method: No-Cook
- Cuisine: American
- Diet: Vegetarian
Ingredients
Cheese Ball Mixture
- 2 (8-ounce) blocks cream cheese, softened
- ¼ cup finely chopped red bell pepper
- ¼ cup finely chopped fresh parsley
- 2 tablespoons finely chopped dried cranberries
- 1 teaspoon garlic powder
- ½ teaspoon onion powder
- ¼ teaspoon salt
- ⅛ teaspoon black pepper
Decoration
- Small black olives, sliced, for snowman eyes and buttons
- 1 small carrot, peeled and cut into a nose shape
- 2 thin pretzel sticks, for snowman arms
- Fresh dill or thyme sprigs, for garnish
- Assorted crackers, for serving
- Cherry tomatoes, for serving
- Green olives, for serving
Instructions
- Combine Ingredients: In a large mixing bowl, combine the softened cream cheese, finely chopped red bell pepper, finely chopped fresh parsley, finely chopped dried cranberries, garlic powder, onion powder, salt, and black pepper. Mix thoroughly until all ingredients are evenly distributed and well incorporated.
- Divide and Shape: Divide the cheese mixture into two portions: two-thirds for the body and one-third for the head. Firmly shape the larger portion into a smooth, round ball for the snowman's body and the smaller portion into another smooth, round ball for the head, compressing well to remove air pockets.
- Chill Cheese Balls: Wrap each cheese ball tightly in plastic wrap and refrigerate for at least 2 hours or until very firm. For best results, chill overnight to ensure the snowman holds its shape perfectly.
- Assemble Snowman: Once chilled, unwrap the cheese balls. Place the larger body ball on a serving platter and gently center the smaller head ball on top, pressing gently to secure.
- Decorate: Use sliced black olives to create the snowman's eyes and buttons by pressing them gently into the cheese. Insert the carrot piece for the nose and push pretzel sticks into the sides for arms. Garnish the top with fresh dill or thyme sprigs to imitate hair or a hat.
- Serve: Arrange assorted crackers, cherry tomatoes, and green olives around the snowman on the platter. Serve immediately or keep refrigerated until ready to serve.
Notes
- For a firmer texture, chill the cheese balls overnight to ensure they hold their shape well.
- You can substitute dried cranberries with dried cherries or raisins for a different flavor.
- If you prefer a milder cheese, mix in some softened goat cheese with the cream cheese.
- To make the snowman more festive, consider adding edible glitter or colored peppercorns for extra decoration.
- Use gluten-free crackers to make this appetizer suitable for gluten-sensitive guests.


Leave a Reply