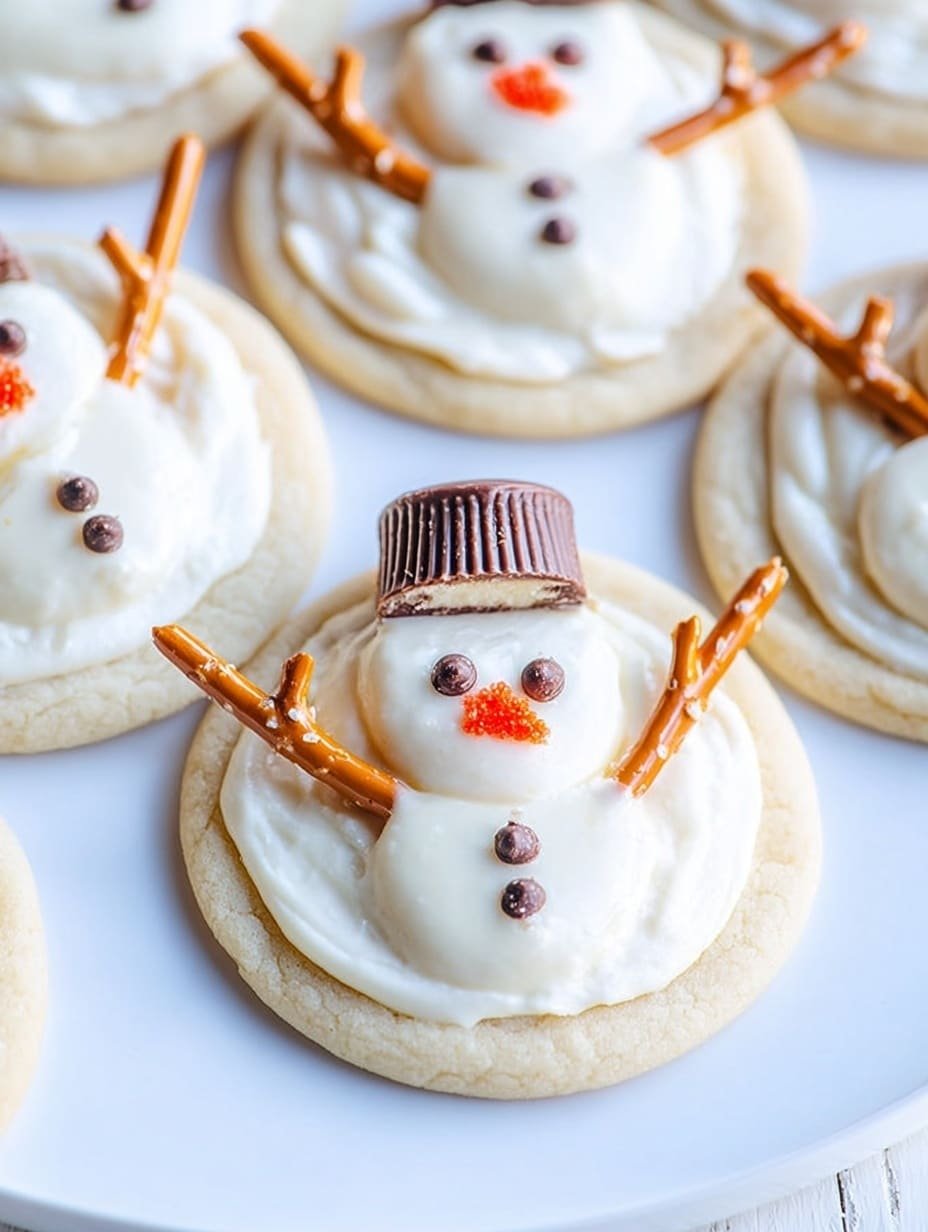
These Melted Snowman Cookies Recipe are a delightful twist on holiday classics, perfect for winter gatherings or a cozy treat by the fire. I love how these cookies combine fun shapes and flavors that everyone recognizes, but with a creative, melted candy "snowman" look that's sure to bring smiles. You'll find that making these cookies is a delightful ritual, especially with kids or any time you want to spread a little seasonal cheer.

Jump to:
What Sets This Apart
What I adore about this Melted Snowman Cookies Recipe is how it effortlessly mixes simple, accessible ingredients into something that looks impressive and tastes nostalgic. It's fun to make but reliable, and the textures-from soft sugar cookies to glossy candy melts-create a satisfyingly playful bite.
- Consistent Results: Following the steps carefully guarantees every cookie has that perfect melted look without getting soggy or messy.
- Rich, Balanced Flavor: The sweetness of sugar cookies blends seamlessly with the creamy peanut butter cup hats and the slight saltiness of pretzel arms.
- Pantry-First Ingredients: Most of these items are staples or easy to find, making this a go-to recipe when you want quick holiday cheer.
- Weeknight Friendly: Prep and assemble in under 30 minutes, so you can whip these up even on busy days without stress.
Ingredient Snapshot
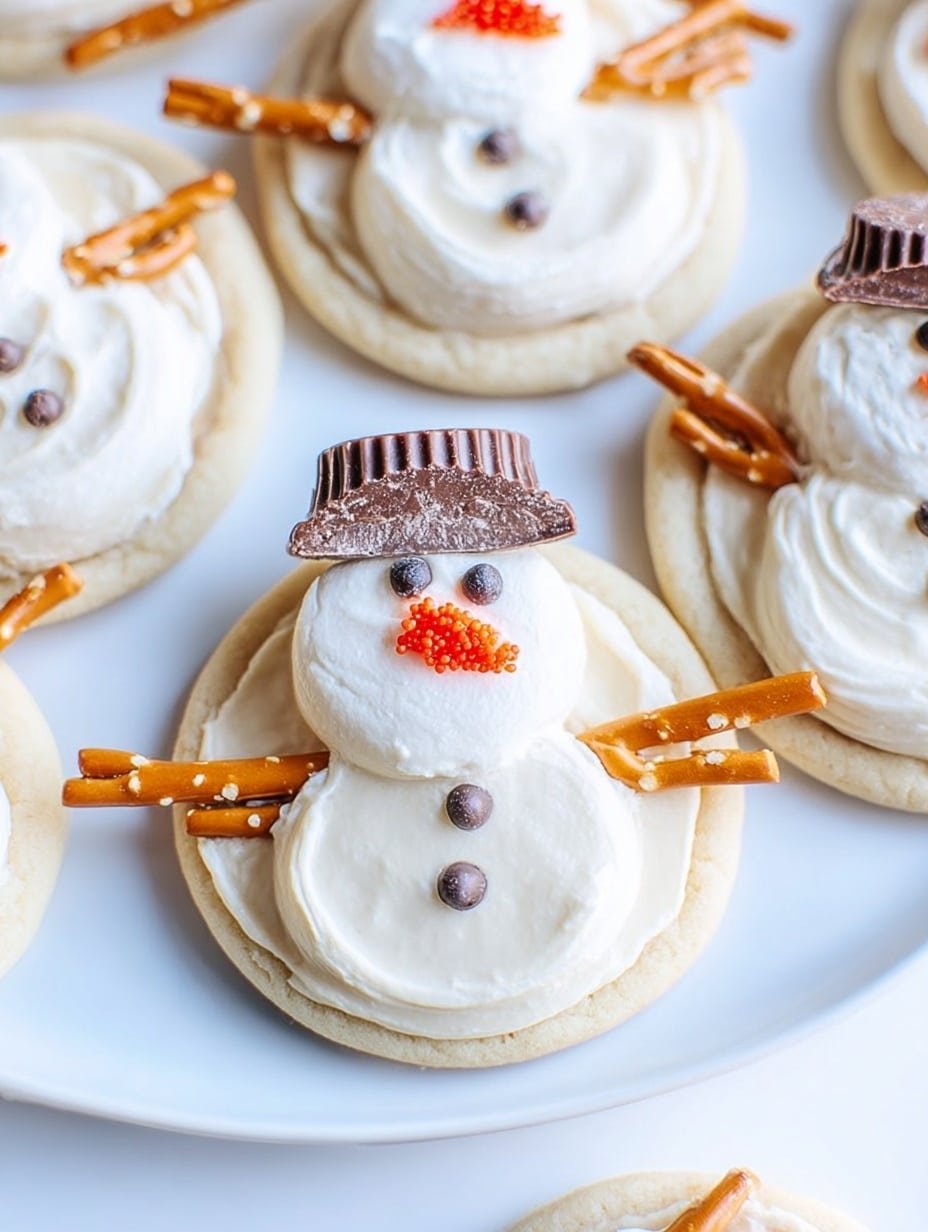
The beauty of this Melted Snowman Cookies Recipe is in its simplicity - focus on quality sugar cookies and smooth candy melts to get that glossy, snowy effect. I always pick the freshest marshmallows and peanut butter cups to ensure everything tastes as good as it looks.
- Sugar Cookies: Homemade is best for flavor and texture, but store-bought cookies work well if you're short on time.
- Large Marshmallows: Fresh, fluffy ones melt beautifully and hold shape under the candy coating.
- White Candy Melts: Choose good-quality melts-they melt evenly and harden to a smooth, glossy finish.
- Mini Reese's Peanut Butter Cups: Cut in half for cute hats with a rich peanut butter punch.
- Miniature Chocolate Chips: These are perfect little eyes that stick well.
- Pretzel Sticks: Opt for sturdy ones that won't snap under gentle pressure.
- Orange Jimmies or Gel: The tiny dash of orange for the nose really brings the snowman to life.
- Sparkling Sugar or Sprinkles (Optional): Adds extra festive shimmer and crunch.
Quick Note: Exact measurements and full instructions are included in the printable recipe card at the bottom for easy reference.
How to Make Melted Snowman Cookies Recipe
Step 1 - Prep & Season
Start by laying out your sugar cookies on parchment paper; this surface keeps everything clean and prevents sticking. Cut the large marshmallows in half horizontally so that each rounded half looks like a perfect snowman body. Make sure to gather all your ingredients and have them within arm's reach; this will speed up assembly and keep the candy melts from setting too soon.
Step 2 - Build Flavor
Melt the white candy melts in short bursts in the microwave, stirring often to prevent burning; a smooth glossy texture is your goal. Spoon melted candy onto each marshmallow half placed on the cookie, spreading it just a bit unevenly so it mimics melting snow naturally. Press half a peanut butter cup right on top for a "hat" - the rich peanut butter flavor adds a surprise contrast you'll love.
Step 3 - Finish for Best Texture
Add miniature chocolate chip eyes, an orange jimmie for the nose, and pretzel stick arms before the candy melt hardens. Don't wait too long-once the candy cools, it gets harder to attach these delicate details. A sprinkle of sparkling sugar on top adds that frosted sparkle we see on freshly fallen snow. Let the whole creation harden at room temperature for at least 20 minutes for the best set and crunch.
Cook's Notes & Tricks
I once tried rushing the candy melt step, and the details slipped off or looked lumpy. Doing it slowly and spreading just enough melt each time makes all the difference. Also, gently pressing the peanut butter cup hat right away prevents cracking or separation later.
- Doneness Cue: The candy melt should harden to a smooth, slightly glossy finish and feel firm to touch after sitting 20 minutes.
- Temperature Trick: Keep your kitchen at a moderate room temperature; too warm spills candy melt, too cold makes it brittle.
- Make-Ahead Move: Assemble cookies and store them covered at room temperature for up to one day before serving.
- Avoid This Pitfall: Don't overheat candy melts-stir every 20 seconds to prevent burning and graininess.
Serve & Enjoy
Finishing Touches
I find that a simple cup of hot chocolate or a mild coffee complements these Melted Snowman Cookies Recipe beautifully. The creamy texture of the candy melts paired with the peanut butter hats lifts the cookie beyond a usual holiday treat. A final dust of sparkling sugar gives a festive glow that's hard to resist.
Pairs Beautifully With
You'll enjoy these with a warm spiced cider, a creamy mug of chai tea, or even a scoop of vanilla ice cream-the soft sweetness balances the salty crunch of pretzels and richness of peanut butter perfectly.
Simple Plating Wins
Place a few cookies on a festive plate dusted lightly with powdered sugar for a snowy effect. Arrange with sprigs of fresh rosemary or pine to add a natural holiday touch. These cookies are as fun as they are pretty-perfect for weeknight treats or as a conversation starter at your next party.
Make-Ahead, Storage & Reheat
Storing Leftovers
Store leftover Melted Snowman Cookies Recipe in an airtight container at room temperature or in the fridge up to 3 days. They hold their shape and glossy candy finish best when cool, but too cold can sometimes dull the shine. Room temperature keeps the textures just right.
Freezing Tips
These cookies freeze well-wrap them individually in parchment paper to avoid sticking, then place in a freezer-safe container for up to one month. Thaw at room temperature to avoid condensation that could dull the candy melts. This is great for prepping ahead of holiday parties.
Reheating Melted Snowman Cookies Recipe Without Drying Out
If you want that freshly-made feel, reheat gently in a low oven (about 250°F) for 5 minutes just to warm the candy melts lightly without melting them again. Alternatively, use a microwave in short 5-second bursts. Adding a small cup of water nearby in the oven helps maintain moisture so the cookies don't dry out during warm-up.
Frequently Asked Questions
Absolutely! While sugar cookies work best due to their sturdy yet tender texture, you can try snickerdoodles or shortbread. Just make sure the cookie is firm enough to support the marshmallow and toppings without breaking.
If white candy melts aren't available, you can use white chocolate chips but melt carefully and add a bit of shortening for smoothness. Alternatively, use vanilla almond bark for a similar effect.
Choose sturdy pretzel sticks and gently press them into the melted candy before it hardens. Avoid using very thin or brittle pretzel varieties that snap easily.
Definitely! This recipe is a fun, hands-on project that kids love. Just supervise when working with hot melted candy to keep everyone safe.
Final Thoughts
Making the Melted Snowman Cookies Recipe always brings me back to simple joys-warm kitchens, festive laughs, and sweet bites that everyone loves. With a few pantry staples, you can create something instantly festive and delicious. I hope you enjoy making these as much as I do-it's a perfect recipe to create lasting memories with family or friends, one glossy snowman cookie at a time.
PrintFull Recipe
Melted Snowman Cookies Recipe

Melted Snowman Cookies are adorable and festive treats perfect for winter holidays. This fun and easy recipe combines soft sugar cookies, marshmallows, white candy melts, and various toppings to create cute snowman faces with chocolate chip eyes, peanut butter cup hats, pretzel stick arms, and orange noses. These no-bake assembled cookies make a delightful sweet project for families and parties.
- Prep Time: 20 minutes
- Cook Time: 0 minutes
- Total Time: 20 minutes
- Yield: 24 cookies
- Category: Dessert
- Method: No-Cook
- Cuisine: American
- Diet: Vegetarian
Ingredients
Cookies and Marshmallows
- 24 prepared sugar cookies
- 12 large marshmallows; cut in half for the body
Decorations
- 12 mini Reese's peanut butter cups; cut in half for the hat
- 48 miniature chocolate chips for the eyes
- 48 pretzel sticks for the arms
- 24 orange jimmies or orange gel for the nose
- Sprinkling of sparkling sugar or sprinkles (optional)
Candy Melt
- 12 ounces white candy melts
Instructions
- Prepare Cookies: Use your favorite sugar cookie recipe or purchase store-bought prepared sugar cookies. Arrange the cookies evenly on parchment-lined baking sheets, ready for assembly.
- Melt Candy: In a microwave-safe bowl, melt the white candy melts according to package instructions until smooth and fully melted.
- Assemble Marshmallow Body: Place half of a large marshmallow on top of each cookie where the snowman's head would be, leaving room for the hat.
- Apply Candy Melt: Spoon the melted candy melts over the marshmallow halves, covering them completely and spreading slightly to the cookie edges for a melted snow effect.
- Add the Hat: Immediately press half of a mini Reese's peanut butter cup onto the top of the marshmallow to create the snowman's hat.
- Create the Face: Add two miniature chocolate chips as eyes and an orange Jimmie (or a dab of orange gel) for the nose on each marshmallow head.
- Attach the Arms: Insert two pretzel sticks into the sides of each cookie to represent the snowman's arms.
- Finish with Sparkle: Optionally sprinkle sparkling sugar or sprinkles on top for a festive shimmer.
- Set and Serve: Allow the cookies to sit at room temperature for at least 20 minutes to let the candy melts harden before serving.
Notes
- Use store-bought sugar cookies for a quick shortcut.
- Substitute orange gel for orange jimmies to create the nose if desired.
- For gluten-free options, use gluten-free sugar cookies and ensure candy melts are gluten-free.
- If you prefer a stronger hat attachment, use a small dab of melted candy melt as glue.
- Store assembled cookies in an airtight container to maintain freshness.
- These cookies can be made a day in advance and kept in a cool place.


Leave a Reply